FIRE CRAFTING
Lean-To
To lay this fire push a green stick into the ground at a 30-degree angle. Point the end of the stick in the direction of the wind. Place some tinder deep under this lean-to stick. Lean pieces of kindling against the lean-to stick. Light the tinder. As the kindling catches fire from the tinder, add more kindling.
Cross-Ditch
To use this method scratch a cross about 30 centimeters in size in the ground. Dig the cross 7.5 centimeters deep. Put a large wad of tinder in the middle of the cross. Build a kindling pyramid above the tinder. The shallow ditch allows air to sweep under the tinder to provide a draft.
Pyramid
To lay this fire place two small logs or branches parallel on the ground. Place a solid layer of small logs across the parallel logs. Add three or four more layers of logs or branches, each layer smaller than and at a right angle to the layer below it. Make a starter fire on top of the pyramid. As the starter fire burns, it will ignite the logs below it. This gives you a fire that burns downward, requiring no attention during the night.
Tepee
To make this fire, arrange the tinder and a few sticks of kindling in the shape of a tepee or cone. Light the center. As the tepee burns, the outside logs will fall inward, feeding the fire. This type of fire burns well even with wet wood.
There are several other ways to lay a fire that are quite effective. Your situation and the material available in the area may make another method more suitable.
Always light your fire from the upwind side. Make sure to lay your tinder, kindling, and fuel so that your fire will burn as long as you need it. Igniters provide the initial heat required to start the tinder burning. They fall into two categories: modern methods and primitive methods.
Modern Methods
Modem igniters use modem devices--items we normally think of to start a fire.
Matches
Make sure these matches are waterproof. Also, store them in a waterproof container along with a dependable striker pad.
Convex Lens
Use this method only on bright, sunny days. The lens can come from binoculars, camera, telescopic sights, or magnifying glasses. Angle the lens to concentrate the sun's rays on the tinder. Hold the lens over the same spot until the tinder begins to smolder. Gently blow or fan the tinder into flame, and apply it to the fire lay.
Metal Match
Place a flat, dry leaf under your tinder with a portion exposed. Place the tip of the metal match on the dry leaf, holding the metal match in one hand and a knife in the other. Scrape your knife against the metal match to produce sparks. The sparks will hit the tinder. When the tinder starts to smolder, proceed as above.
Battery
Use a 9 volt battery or car battery to generate a spark. Use of this method depends on the type of battery available. Attach a wire to each terminal. Touch the ends of the bare wires together next to the tinder so the sparks will ignite it. To make this process easy, use steel wool (best) or toilet paper/tissue paper as it will ignite quickly. You will need to find a way to touch the positive and negative terminals together (basically creating a short circuit) so that you get a spark.
Gunpowder
Often, you will have ammunition with your equipment. If so, carefully extract the bullet from the shell casing, and use the gunpowder as tinder. A spark will ignite the powder. Be extremely careful when extracting the bullet from the case.
Primitive Methods
Primitive igniters are those attributed to our early ancestors.
Flint and Steel
The direct spark method is the easiest of the primitive methods to use. The flint and steel method is the most reliable of the direct spark methods. Strike a flint or other hard, sharp-edged rock edge with a piece of carbon steel (stainless steel will not produce a good spark). This method requires a loose-jointed wrist and practice. When a spark has caught in the tinder, blow on it. The spark will spread and burst into flames.
Fire-Plow
The fire-plow is a friction method of ignition. You rub a hardwood shaft against a softer wood base. To use this method, cut a straight groove in the base and plow the blunt tip of the shaft up and down the groove. The plowing action of the shaft pushes out small particles of wood fibers. Then, as you apply more pressure on each stroke, the friction ignites the wood particles.
Bow and Drill
The technique of starting a fire with a bow and drill is simple, but you must exert much effort and be persistent to produce a fire. You need the following items to use this method:
Socket. The socket is an easily grasped stone or piece of hardwood or bone with a slight depression in one side. Use it to hold the drill in place and to apply downward pressure.
Drill. The drill should be a straight, seasoned hardwood stick about 2 centimeters in diameter and 25 centimeters long. The top end is round and the low end blunt (to produce more friction).
Fire board. Its size is up to you. A seasoned softwood board about 2.5 centimeters thick and 10 centimeters wide is preferable. Cut a depression about 2 centimeters from the edge on one side of the board. On the underside, make a V-shaped cut from the edge of the board to the depression.
Bow. The bow is a resilient, green stick about 2.5 centimeters in diameter and a string. The type of wood is not important. The bowstring can be any type of cordage. You tie the bowstring from one end of the bow to the other, without any slack.
To use the bow and drill, first prepare the fire lay. Then place a bundle of tinder under the V-shaped cut in the fire board. Place one foot on the fire board. Loop the bowstring over the drill and place the drill in the pre-cut depression on the fire board. Place the socket, held in one hand, on the top of the drill to hold it in position. Press down on the drill and saw the bow back and forth to twirl the drill. Once you have established a smooth motion, apply more downward pressure and work the bow faster. This action will grind hot black powder into the tinder, causing a spark to catch. Blow on the tinder until it ignites.
Pump Fire Drill
The Iroquois invented this ingenious pump drill, which uses a flywheel to generate friction. The crossbar and flywheel are made of hardwood; the spindle and fire board are made from softwoods (as in the hand drill).
Step One Bore a hole in the center of a rounded piece of hardwood and force the spindle in so that it fits tightly. Select wood for the crossbar and bore a larger hole that will slide freely on the spindle.
Step Two Attach the crossbar to the top of the spindle with a leather thong or sturdy shoelace.
Step Three Wind up the flywheel so that the thong twists around the spindle, then press down. The momentum will rewind the crossbar in the opposite direction. Repeat until friction creates a glowing ember.
Two Man Drill Method
Two people can do a better job of maintaining the speed and pressure needed to create an ember using this string variation of a friction drill.
Step One Have one person apply downward pressure to the drill while the other uses a thong or shoelace to rapidly rotate the spindle.
Hand Drill
Using a hand drill is one of the simplest friction methods, but high speed can be difficult to maintain because only the hands are used to rotate the spindle. It works best in dry climates.
Step One Cut a V-shaped notch in the fire board, then start a small depression adjacent to it with a rock or knife tip. Set a piece of bark underneath the notch to catch the ember.
Step Two Place the spindle, which should be 2 feet long, in the depression and, maintaining pressure, roll it between the palms of your hands, running them quickly down the spindle in a burst of speed. Repeat until the spindle tip glows red and an ember is formed.
Step Three Tap the fire board to deposit the ember onto the bark, then transfer it to a tinder bundle and blow it to flame.
Tinder Bundle
This is what a proper tinder bundle should look like and should be constructed before you begin your fire starting process.
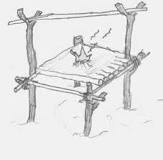
Elevated Fire Platform
If you are in a very wet environment where the ground is totally saturated or there is standing water, you can still build a fire. When you construct the elevated fire platform, you will need to put a layer of mud down to ensure that the fire does not burn through the platform base. You want to use mud that is moist but no so much that water runs out of it. You will need to ensure that your tinder bundle is burning well before you place it down on the mud and have your smaller twigs ready to get the fire going.
There are numerous other ways to start a fire, but these are the most common and each have a degree of difficulty. Knowing several ways to get a fire started is important because one way might work better for you than another, so you need to practice them all to find which one works best for you. Remember, starting a fire using a primitive method is never easy and is very time consuming and takes a lot of patience on your part, but can and will save your life.


No comments:
Post a Comment