Friday, November 25, 2011

Fire Crafting

FIRE CRAFTING

Lean-To

To lay this fire push a green stick into the ground at a 30-degree angle. Point the end of the stick in the direction of the wind. Place some tinder deep under this lean-to stick. Lean pieces of kindling against the lean-to stick. Light the tinder. As the kindling catches fire from the tinder, add more kindling.

Cross-Ditch

To use this method scratch a cross about 30 centimeters in size in the ground. Dig the cross 7.5 centimeters deep. Put a large wad of tinder in the middle of the cross. Build a kindling pyramid above the tinder. The shallow ditch allows air to sweep under the tinder to provide a draft.

Pyramid

To lay this fire place two small logs or branches parallel on the ground. Place a solid layer of small logs across the parallel logs. Add three or four more layers of logs or branches, each layer smaller than and at a right angle to the layer below it. Make a starter fire on top of the pyramid. As the starter fire burns, it will ignite the logs below it. This gives you a fire that burns downward, requiring no attention during the night.

Tepee

To make this fire, arrange the tinder and a few sticks of kindling in the shape of a tepee or cone. Light the center. As the tepee burns, the outside logs will fall inward, feeding the fire. This type of fire burns well even with wet wood.

There are several other ways to lay a fire that are quite effective. Your situation and the material available in the area may make another method more suitable.


Always light your fire from the upwind side. Make sure to lay your tinder, kindling, and fuel so that your fire will burn as long as you need it. Igniters provide the initial heat required to start the tinder burning. They fall into two categories: modern methods and primitive methods.
Modern Methods

Modem igniters use modem devices--items we normally think of to start a fire.

Matches

Make sure these matches are waterproof. Also, store them in a waterproof container along with a dependable striker pad.
Convex Lens

Use this method only on bright, sunny days. The lens can come from binoculars, camera, telescopic sights, or magnifying glasses. Angle the lens to concentrate the sun's rays on the tinder. Hold the lens over the same spot until the tinder begins to smolder. Gently blow or fan the tinder into flame, and apply it to the fire lay.

Metal Match

Place a flat, dry leaf under your tinder with a portion exposed. Place the tip of the metal match on the dry leaf, holding the metal match in one hand and a knife in the other. Scrape your knife against the metal match to produce sparks. The sparks will hit the tinder. When the tinder starts to smolder, proceed as above.

Battery

Use a 9 volt battery or car battery to generate a spark. Use of this method depends on the type of battery available. Attach a wire to each terminal. Touch the ends of the bare wires together next to the tinder so the sparks will ignite it. To make this process easy, use steel wool (best) or toilet paper/tissue paper as it will ignite quickly. You will need to find a way to touch the positive and negative terminals together (basically creating a short circuit) so that you get a spark.

Gunpowder

Often, you will have ammunition with your equipment. If so, carefully extract the bullet from the shell casing, and use the gunpowder as tinder. A spark will ignite the powder. Be extremely careful when extracting the bullet from the case.

Primitive Methods

Primitive igniters are those attributed to our early ancestors.

Flint and Steel

The direct spark method is the easiest of the primitive methods to use. The flint and steel method is the most reliable of the direct spark methods. Strike a flint or other hard, sharp-edged rock edge with a piece of carbon steel (stainless steel will not produce a good spark). This method requires a loose-jointed wrist and practice. When a spark has caught in the tinder, blow on it. The spark will spread and burst into flames.

Fire-Plow

The fire-plow is a friction method of ignition. You rub a hardwood shaft against a softer wood base. To use this method, cut a straight groove in the base and plow the blunt tip of the shaft up and down the groove. The plowing action of the shaft pushes out small particles of wood fibers. Then, as you apply more pressure on each stroke, the friction ignites the wood particles. 


Bow and Drill

The technique of starting a fire with a bow and drill is simple, but you must exert much effort and be persistent to produce a fire. You need the following items to use this method:

    Socket. The socket is an easily grasped stone or piece of hardwood or bone with a slight depression in one side. Use it to hold the drill in place and to apply downward pressure.

    Drill. The drill should be a straight, seasoned hardwood stick about 2 centimeters in diameter and 25 centimeters long. The top end is round and the low end blunt (to produce more friction).

    Fire board. Its size is up to you. A seasoned softwood board about 2.5 centimeters thick and 10 centimeters wide is preferable. Cut a depression about 2 centimeters from the edge on one side of the board. On the underside, make a V-shaped cut from the edge of the board to the depression.

    Bow. The bow is a resilient, green stick about 2.5 centimeters in diameter and a string. The type of wood is not important. The bowstring can be any type of cordage. You tie the bowstring from one end of the bow to the other, without any slack.

To use the bow and drill, first prepare the fire lay. Then place a bundle of tinder under the V-shaped cut in the fire board. Place one foot on the fire board. Loop the bowstring over the drill and place the drill in the pre-cut depression on the fire board. Place the socket, held in one hand, on the top of the drill to hold it in position. Press down on the drill and saw the bow back and forth to twirl the drill. Once you have established a smooth motion, apply more downward pressure and work the bow faster. This action will grind hot black powder into the tinder, causing a spark to catch. Blow on the tinder until it ignites. 

Pump Fire Drill

The Iroquois invented this ingenious pump drill, which uses a flywheel to generate friction. The crossbar and flywheel are made of hardwood; the spindle and fire board are made from softwoods (as in the hand drill).

Step One Bore a hole in the center of a rounded piece of hardwood and force the spindle in so that it fits tightly. Select wood for the crossbar and bore a larger hole that will slide freely on the spindle.

Step Two Attach the crossbar to the top of the spindle with a leather thong or sturdy shoelace.

Step Three Wind up the flywheel so that the thong twists around the spindle, then press down. The momentum will rewind the crossbar in the opposite direction. Repeat until friction creates a glowing ember.

Two Man Drill Method

Two people can do a better job of maintaining the speed and pressure needed to create an ember using this string variation of a friction drill.

Step One Have one person apply downward pressure to the drill while the other uses a thong or shoelace to rapidly rotate the spindle.

Hand Drill

Using a hand drill is one of the simplest friction methods, but high speed can be difficult to maintain because only the hands are used to rotate the spindle. It works best in dry climates.

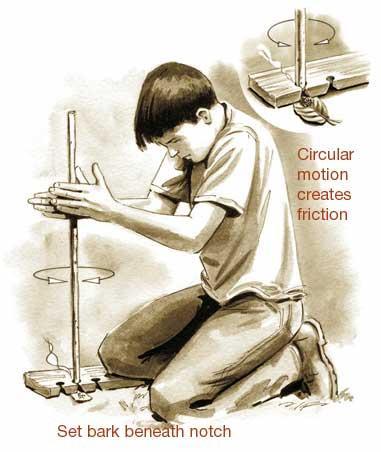
Step One Cut a V-shaped notch in the fire board, then start a small depression adjacent to it with a rock or knife tip. Set a piece of bark underneath the notch to catch the ember.

Step Two Place the spindle, which should be 2 feet long, in the depression and, maintaining pressure, roll it between the palms of your hands, running them quickly down the spindle in a burst of speed. Repeat until the spindle tip glows red and an ember is formed.

Step Three Tap the fire board to deposit the ember onto the bark, then transfer it to a tinder bundle and blow it to flame.
Tinder Bundle

This is what a proper tinder bundle should look like and should be constructed before you begin your fire starting process.
Elevated Fire Platform

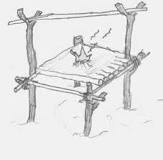
If you are in a very wet environment where the ground is totally saturated or there is standing water, you can still build a fire. When you construct the elevated fire platform, you will need to put a layer of mud down to ensure that the fire does not burn through the platform base. You want to use mud that is moist but no so much that water runs out of it. You will need to ensure that your tinder bundle is burning well before you place it down on the mud and have your smaller twigs ready to get the fire going.
There are numerous other ways to start a fire, but these are the most common and each have a degree of difficulty. Knowing several ways to get a fire started is important because one way might work better for you than another, so you need to practice them all to find which one works best for you. Remember, starting a fire using a primitive method is never easy and is very time consuming and takes a lot of patience on your part, but can and will save your life. 

Wednesday, November 23, 2011

First Aid For Poisonous Snake Bites

FIRST AID FOR SNAKE BITES


  One of the most common injuries that happen while hunting is snake bites. It is important to know and understand basic first aid for snake bites because administering basic first aid can save life and limb if done properly. In this tutorial we will go over the signs and symptoms of snake bites and how to administer basic first aid treatment for them.

  There are numerous types of venomous snakes found all over the world and each having different types of venom. The two types of venoms are hemotoxic which attack and destroy tissue and blood cells, as the venom spreads it causes massive swelling to the point where the skin will rupture causing blood loss and extreme tissue death called necrosis. If not treated quickly, a victim could lose the extremity and eventually lead to death.

  The next type of venom is neurotoxin, which attacks the central nervous system shutting down vital nerves that control breathing and the heart causing death. The venom can spread rapidly, shutting down other vital organs through out the body.

  Most North American snakes aren't poisonous. Some exceptions include the rattlesnake, coral snake, water moccasin and copperhead. These snake bites can be life-threatening. It is important to know the different types of poisonous snakes for the region you are hunting in. Knowing this information can help medical personnel administer the appropriate anti venom and treatment. The wrong anti venom and treatment can cause more harm than good. Of the poisonous snakes found in North America, all but the coral snake have slit-like eyes. Their heads are triangular, with a depression, or pit, midway between the eyes and nostrils.

North American Poisonous Snake Characteristics:

Rattlesnakes – There are many different types of species of rattlesnakes in the United States, each with a different appearance and habitat. Rattlesnakes share a unique but common characteristic because they rattle by shaking the rings at the end of their tails. In most cases, Rattlesnakes will give a warning by rattling, but it is important to remember that they may not always give a warning before striking
Eastern Diamond Back
 Timber Rattle Snake
 Mohave Rattle Snake
 Tiger Rattle Snake
Rock Rattle Snake
 Sidewinder Rattle Snake
 Lower California Rattle Snake
 Speckled Rattle Snake
Western Diamond Back
 
Copperhead – Copperhead snakes blend extremely well into their environment and are extremely hard to see. Copperheads do not give any warning before striking.


Water Moccasin or Cotton Mouth – Cotton Mouth/Water Moccasins commonly have mouths that have a white, cottony lining. These snakes generally live near bodies of water such as rivers, bogs, ponds, lakes, etc.


Coral Snake - Coral snakes have a unique characteristic in the color of their bands because they have red, yellow and black rings along the length of their bodies. I am sure that many have heard the expression “red and yellow kill a fellow” and “red and black, venom lack”. This is an easy way to distinguish if it is a Coral snake or another non venomous snake that looks like a Coral snake such as the Louisiana Milk snake. If the red bands touch the yellow bands, then it is a Coral snake. If the red bands touch the black bands, then it is not a Coral snake and is non venomous.

  If you are not 100% sure about a snake being venomous or not, then the best course of actions is to avoid it all together or if bitten, kill the snake if you can do so safely and from a distance. It is always better to be safe then sorry.


Common Signs and Symptoms:

Rattle Snake Bites:

Rattlesnake bites are painful when they occur. Symptoms usually begin right away and may include:
  • Bleeding
  • Breathing difficulty
  • Blurred vision
  • Eyelid drooping
  • Low blood pressure
  • Nausea and vomiting
  • Numbness
  • Pain at site of bite
  • Paralysis
  • Rapid pulse
  • Skin color changes
  • Swelling
  • Tingling
  • Tissue damage
  • Thirst
  • Tiredness
  • Weakness
  • Weak pulse

Cotton Mouth snake bite:

Cottonmouth and copperhead bites are painful right when they occur. Symptoms, which usually begin right away, may include:
  • Bleeding
  • Breathing difficulty
  • Low blood pressure
  • Nausea and vomiting
  • Numbness and tingling
  • Pain at site of bite
  • Shock
  • Skin color changes
  • Swelling
  • Thirst
  • Tiredness
  • Tissue damage
  • Weakness
  • Weak pulse

Coral Snake Bite:

  Coral snake bites may be painless at first. Major symptoms may not develop for hours. Do NOT make the mistake of thinking you will be fine if the bite area looks good and you are not in a lot of pain. Untreated coral snake bites can be deadly. Symptoms may include:
  • Blurred vision
  • Breathing difficulty
  • Convulsions
  • Drowsiness
  • Eyelid drooping
  • Headache
  • Low blood pressure
  • Mouth watering (excessive salivation)
  • Nausea and vomiting
  • Numbness
  • Pain and swelling at site of bite
  • Paralysis
  • Shock
  • Slurred speech
  • Swallowing difficulty
  • Swelling of tongue and throat
  • Weakness
  • Skin color changes
  • Skin tissue damage
  • Stomach or abdominal pain
  • Weak pulse

Copperhead snake bite:

Copperhead bites are painful when they occur. Symptoms usually begin right away and may include:
  • Bleeding
  • Breathing difficulty
  • Blurred vision
  • Eyelid drooping
  • Low blood pressure
  • Nausea and vomiting
  • Numbness
  • Pain at site of bite
  • Paralysis
  • Rapid pulse
  • Skin color changes
  • Swelling
  • Tingling
  • Tissue damage
  • Thirst
  • Tiredness
  • Weakness
  • Weak pulse


Snake Bite Treatment:

The following is the best course of action for basic first aid treatment if bitten by a venomous snake.

  • Remain calm – It is important to remain as calm as possible because the more excited the victim gets, the faster the heart will beat and the faster the poison will spread through the body.
  • Immobilize the bitten arm or leg and stay as quiet as possible to keep the poison from spreading through your body.
  • Remove jewelry before you start to swell – It is important to remove anything that will be restrictive as the tissue swells. This will lead to further injury and make if much more difficult for medical personnel in treatment.
  • Position yourself, if possible, so that the bite is at or below the level of your heart. By keeping the extremity below the heart the poison will not spread as quickly.
  • Cleanse the wound, but don't flush it with water, and cover it with a clean, dry dressing. By cleaning the wound if possible and time allows, will help reduce the chances of complications due to infections.
  • Apply a splint to reduce movement of the affected area, but keep it loose enough so as not to restrict blood flow. Splinting will help keep the wounded area from being moved and help reduce the spread of the poison. When splinting, ensure that the cloth or other material used is not so tight that it reduces the arterial blood flow like a tourniquet would.
  • Don't use a tourniquet or apply ice – If possible apply ice to help reduce tissue swelling and keep the poison as localized as possible. Applying a tourniquet will only cause further injury. Try to apply constricting bands above and below the injury, but only make them tight enough to reduce the small capillary blood flow to the superficial tissue.
  • Don't cut the wound or attempt to remove the venom – Cutting the puncture wounds open will only cause more tissue damage without removing very much venom. Do not attempt to suck out the poison with your mouth as this will only cause the poison to get into your system. If you have one available use a snake bite kit sold at most outdoor or hunting stores.
  • Don't drink caffeine or alcohol – Caffeine will only raise your heart rate causing the venom to spread quicker and alcohol has a blood thinning property which will cause the heart to be able to pump the venom through the body quicker.
  • Don't try to capture the snake, but try to remember its color and shape so you can describe it, which will help in your treatment – If you attempt to capture the snake, you may be bitten as well. If you can safely kill the snake, then do so. Never pick up a snake that you think is dead because the nerves are still active for up to several hours after the snake’s death and you can be bitten.
  Call 911 or seek immediate medical attention, especially if the area changes color, begins to swell or is painful. Try to get medical treatment within 30 minutes or less if possible. You may also call the National Poison Control Center (1-800-222-1222), they can help assist you in first aid treatment while you wait for help to arrive.
Be Prepared:
 Always carry a cell phone and hand held radio (walkie talkie) when going into the wilderness for communication purposes, a local map of the area so you can give directions and use land marks as reference points, always tell someone where you are going and the general area you will be in and what time they should expect you back, and always carry a first aid kit with a snake bit kit included. Try to think of what can happen and then prepare for those situations as much as possible. 

Prevention:

Preventing snake bites:
  Some bites, such as those inflicted when you accidentally step on a snake in the woods, are nearly impossible to prevent. However, there are precautions that can reduce your chances of being bitten by a snake. These include:
  • Leave snakes alone. Many people are bitten because they try to kill a snake or get too close to it.
  • Avoid areas where snakes may be hiding, such as under rocks and logs. Avoid stepping directly over a fallen tree or log, instead use a long stick to poke in front and behind the log and then step onto it and jump a 2-3 feet away from the log, this will keep you out of the striking distance in most cases.
  • Even though most snakes are not poisonous, avoid picking up or playing with any snake unless you have been properly trained.
  • If you hike often, consider buying a snake bite kit (available from hiking supply stores). Do not use older snake bite kits, such as those containing razor blades and suction bulbs.
  • Don't provoke a snake. That is when many serious snake bites occur.
  • Tap ahead of you with a walking stick before entering an area where you can't see your feet. Snakes will try to avoid you if given enough warning.
  • When hiking in an area known to have snakes, wear long pants and boots if possible.


Tuesday, November 22, 2011

Morse Code To Signal For Help

MORSE CODE INFORMATION


Morse code, the most important thing that you absolutely need to know is how to signal for help or demonstrate the universal SOS. Below is Morse code and shows SOS:  Morse code was widely used as a form of communication over long distance back when the telegraph system was implemented. Morse code consists of dots and dashes in a specific way to spell out words along with some common pro signs that meant specific things. Morse code was widely used by the Military and civilian communication services.

  In our modern times we communicate using telephones, the internet, and video media and have since abandoned Morse code with the exception of maybe a few private radio operators. I think that it is important to know the basics of Morse code because if we lose our current communication technology, Morse code will ensure our ability to still communicate in an efficient manner.

 If you learn nothing else about

SOS=    · · · — — — · · ·

  This can be sent many ways: keying a radio on and off, flashing a mirror, toggling a flashlight and similar methods, or if necessary you can use wood, debris, grass, or write it in the sand so that it can be seen from above by aircraft. Remember that when trying to signal aircraft that you use a material that has a lighter or darker contrast so that signal stands out.


 You can also use any reflective surface during the day to send signals because a bright flashing reflection can be seen from miles away. The general rule if you are stranded is to stay put so that rescuers can find you easier, but this is not always the choice that needs to be made. If you are stranded in an area where water and food are not available, then you may need to move to a more sustainable area. If you have to leave, you need to mark the direction of travel so that if help does arrive they know the direction you are going. It is also important to mark your trail as you go. This can be done by stacking rocks or making Xs with sticks or logs and again mark your direction of travel with an arrow with the point showing what direction you are traveling.

If you are in a situation where you are stranded, I hope this information will be a valuable asset in you being found safely and eventually returned home to your loved ones.

Sunday, November 20, 2011

Black Widow and Brown Recluse Bites


Brown Recluse Spider


The Brown Recluse spider is a small brown spider that hides in undisturbed clothing, shoes, gloves, closeted equipment and in other places infrequently visited. They are sometimes characterized by the presence of the shape of a violin or fiddle on their back giving them their colloquial name “fiddle back” spider. This isn’t necessarily the best way to identify Brown Recluse spiders. The best way to clearly identify these spiders is to notice they have three sets of two eyes sometimes arranged like a human’s two eyes and nose. The brown recluse bite is sometimes not painful or noticed until it becomes a serious skin and tissue lesion. One should seek medical attention if they notice a pimple or blood blister becoming worse in a period of a few hours to a day to become similar to that of a boil. If untreated, the wound can become gangrenous and potentially life threatening. The skin tissue will not heal and the wound will continue to spread. The tissue will continue to die causing the skin to peel away and the hole where the bite initially is will continue to go deeper into muscle tissue if not treated quickly. The best treatment is recognition and immediate professional medical care.


Brown Recluse Bite Symptoms
Brown recluse spider bites often go unnoticed initially because they are usually painless bites. Occasionally, some minor burning that feels like a bee sting is noticed at the time of the bite. Symptoms usually develop two to eight hours after a bite. Keep in mind that most bites cause little tissue destruction.
  • Victims may experience these symptoms:
·         severe pain at bite site after about four hours
·         severe itching
·         nausea
·         vomiting
·         fever
·         Muscle pain.

  • Initially the bite site is mildly red and upon close inspection may reveal fang marks. Most commonly, the bite site will become firm and heal with little scaring over the next few days or weeks. Occasionally, the local reaction will be more severe with erythema and blistering, sometimes leading to a blue discoloration, and ultimately leading to a necrotic lesion and scarring. Signs that may be present include:
·         Blistering (common)
·         Necrosis (death) of skin and subcutaneous fat (less common)
·         Severe destructive necrotic lesions with deep wide borders (rare)


 Brown Recluse Wound Prictures
                              Brown Recluse Initial bite

                              3 day after bite


                                        9 days after initial bite/ Scar 10 months after bite(below)


Treatment for Brown Recluse Spider Bites


  •      Ensure victims airway is not compromised (in severe reaction situations)
  •   Seek medical attention as soon as possible

  • There is no anti venom available in the United States to counteract the poisonous venom of the brown recluse spider. Controversial therapies include steroids and the drug dapsone (Avlosulfon). These are often reserved for people with severe systemic disease (such as certain types of anemia, blood clotting problems, and kidney failure). The therapies have little proven benefit.
  •  The patient will need to follow-up with a doctor because most wounds will need to be checked daily for at least three to four days. Necrotic lesions will need close follow-up. The doctor may carefully remove dead tissue in necrotic areas to reduce the chance of developing secondary bacterial infections.
Black Widow Spider
The Black Widow Spider is a relatively small black spider with a characteristic red hourglass shape on its underbelly. The Southern Black Widow spider commonly spins its web in quiet, dry places such as under water meter covers, pieces of firewood or logs, in quite tool sheds and the like. This spider is quite poisonous and can produce a bite that requires medical attention. The bite is usually quite painful followed by several non localized symptoms that always indicate emergency medical attention. Any bite followed by muscle ache, cramps, abdominal pain, nervous jitter, vomiting, dizziness, chest pain and trouble breathing should be an indication of a potential life threatening condition that requires emergency medical attention.
                                           Red Back (Same species as black widow)

Black Widow Spider Bite Symptoms

The black widow spiders produce a type of protein venom that affects the victim's nervous system. This neurotoxin protein is one of the most potent venom secreted by an animal. Some people are slightly affected by the venom, but others may have a severe response. The first symptom is acute pain at the site of the bite, although there may only be a minimal local reaction. Symptoms usually start within 20 minutes to one hour after the bite.
  • Local pain may be followed by localized or generalized severe muscle cramps, abdominal pain, weakness, and tremor. Large muscle groups (such as shoulder or back) are often affected, resulting in considerable pain. In severe cases, nausea, vomiting, fainting, dizziness, chest pain, and respiratory difficulties may follow.
  • The severity of the reaction depends on the age and physical condition of the person bitten. Children and the elderly are more seriously affected than young adults.
  • In some cases, abdominal pain may mimic such conditions as appendicitis or gallbladder problems. Chest pain may be mistaken for a heart attack.
  • Blood pressure and heart rate may be elevated. The elevation of blood pressure can lead to one of the most severe complications.
  • People rarely die from a black widow's bite. Life-threatening reactions are generally seen only in small children and the elderly.

    Treatment for Black Widow Bite
    • Quick Recognition that it is a black widow bite
    • Place ice packs over bite area to help reduce swelling and slow the progression of the poison.
    • Watch victim closely for respiratory problems
    •   Immediate care by a healthcare professional